In this article:
Once all the files have been updated and completed, Schedule Build will use those files to create routes for the first week of the planning period. The first week’s routes will be the base from which routes for the remaining weeks in the planning period will be built.
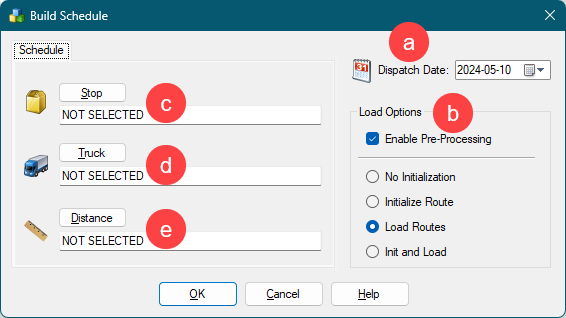
To begin the Schedule Build and select all input parameters, select File > New > Schedule from the menu.
Input Parameters


- Dispatch Date: Select the earliest date to dispatch/schedule vehicles; the default is Sunday.
- Enable Preprocessing: Uses Preprocess settings from Routing Preferences.
- Stop File: Select the Stop File (.stp, .xls, .xlsx, etc.).
- Truck File: Select the Truck File (.truck, .trk, .xls, .xlsx).
- Pattern Data File: Select the Pattern Data File (.TXT).
- Distance File: Select the Distance File (.dist).
Period Planning Parameters

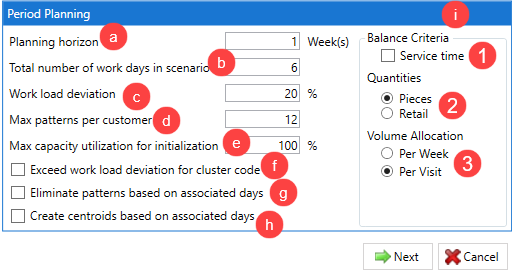
- Planning Horizon: Number of weeks the scheduling solution will cover.
- Total Days of Operation: The number of days the solution will cover in a week (ex: 2 = 2 days per week).
- Workload Deviation: Used with Max Capacity Utilization, an amount (%) by which the truck Capacity can be adjusted.
- Max Patterns Per Customer: The number of Delivery Patterns in use by a customer (set to a minimum of Total Days of Operation).
- Max Capacity Utilization for Initialization: The percentage of Max Capacity that SchedulePro can assign (load) on a truck, before considering another truck; used with Work Load Deviation during the optimization process.
- Exceed workload deviation for cluster code: Selection allows SchedulePro to ignore the Workload Deviation if required, to honor Cluster Codes.
- Eliminate patterns based on associated days: Reviews the Pattern1 of each stop and anchors that day eliminating all other patterns in the Pattern Library for a customer that doesn’t include that specific Pattern1 day. The algorithm does this regardless of whether this option is selected True or False.
- Create centroids based on associated days: If the Day column has been imported, SchedulePro will create route centroids based on the provided days.
Balance Criteria Parameters
- Service Time: Considers Fixed Time, in addition to Capacity, when assigning customers.
- Quantities: Select the Capacity field that will be used for balancing purposes; default is the first quantity field listed in Preferences > Configuration > Volume.
- Volume Allocation: Choose how customer volume should be allocated per week or visit.
Click Next after all selections have been made. When the build is complete, the results will appear on the next screen.
Days Between Optimization
Days Between Optimization does not use the volume allocation algorithm for scheduling. Instead, it relies on the standard DirectRoute algorithm to load accounts and pick delivery days based on the routed answer. Pattern integrity is maintained by filling in two additional columns in the stop file called MinDaysBetweenDeliveries and MaxDaysBetweenDeliveries. These columns tell DirectRoute how many days must be allowed between deliveries when SchedulePro explodes the account master.
To use SchedulePro this way, update your SchedulePro preferences (File > Preferences > SchedulePro) and change the Algorithm Type to Regular:

Build your account master stop file normally, one record per store. Include frequency and fill out the columns called MinDaysBetweenDeliveries and MaxDaysBetweenDeliveries. These columns indicate how many days at minimum and maximum should be allowed between deliveries.
For example, a frequency two account may have a MinDaysBetweenDeliveries of 2 and a MaxDaysBetweenDeliveries of 3. With those values, if the first record was scheduled for a Tuesday, the second delivery could only be scheduled for Thursday or Friday. If you need to lock a group of stops to certain days, then before routing, Pattern1 should be set to the delivery days required. If you leave pattern 1 with MTWRF, then SchedulePro will pick the correct day during routing. SchedulePro will explode the account master and change pattern 1 to the selected day.
To start a solution, click File > New Schedule from the menu, and select your stop, truck, and distance files per usual. When selecting the stop and truck file, SchedulePro will automatically create a copy of the stop and/or truck file that will contain the exploded records. These are the names of your files amended with _Explode (e.g. stopfile_Explode.xls). Once you finish selecting your files, click Load to begin the routing and scheduling process.
If this is a multi-week problem with frequencies less than 1, after the initial pass, click SchedulePro > Explode Stops from the menu:

Using SchedulePro this way prioritizes efficient routing over balancing daily volume. As a result, you may notice a routed answer will appear to have the week front-loaded, particularly if there is a high proportion of low-frequency stops (occurring once or twice weekly). However, this approach may lead to an increase in stops with no assigned load, especially among higher-frequency stops.
To adjust for this, you can manually shift volume to later in the week. This can be done by modifying your truck file for routes earlier in the week. Limiting volume, hours, or even the number of routes available on EDates 1, 2, and 3 will encourage more stops to be scheduled later in the week. Additionally, you can change the pattern of frequency to one account so that they can only be scheduled later in the week (e.g. Pattern 1 changing from MTWRF to WRF), which can seed routes later and distribute volume more evenly.